Create User
Complete the following steps to create a user.
- Steps to Create a User with a User Role - Manager, Remediation User, and Auditor
- Steps to Create a User with a User Role - Unit Manager, Scanner, and Reader
- Steps to Create a User with a User Role - Contact and User Administrator
Steps to Create a User with a User Role - Manager, Remediation User, and Auditor
Steps to Create a User with a User Role - Unit Manager, Scanner, and Reader
Complete the following steps to create a user with the Unit Manager, Scanner, and Reader User Roles. Apart from step 4: Permissions, the other steps are common irrespective of the user role.
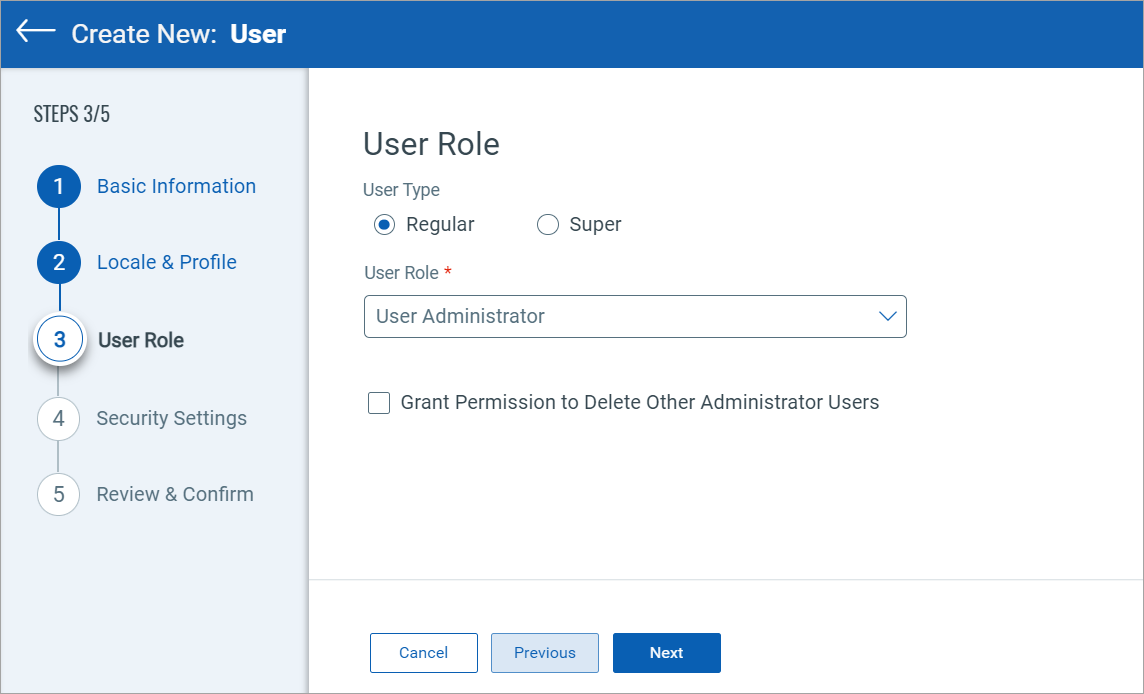
Steps to Create a User with a User Role - Contact and User Administrator
Complete the following steps to create a user with a Contact or User Administrator role.
Basic Information
|
User Input |
Mandatory/Optional |
Description |
|---|---|---|
|
First Name |
Mandatory |
Provide the First Name. |
|
Last Name |
Mandatory |
Provide the Last Name. |
|
Title |
Mandatory |
Provide the Title. |
|
|
Mandatory |
Provide the Email ID. |
|
Phone Number |
Optional |
Provide the Phone Number. |
|
Zip Code |
Optional |
Provide the Zip Code. |
|
Country |
Mandatory |
Provide the Country Name. |
|
State |
Optional |
Provide the State Name. |
|
City |
Optional |
Provide the City Name. |
|
Address |
Mandatory |
Provide the Address. |
Locale & Profile
|
User Input |
Mandatory/Optional |
Description |
|---|---|---|
|
Language |
Mandatory |
Select the language. As of now, the English language is pre-selected. |
|
Date Format |
Mandatory |
Select the Date Format, like EU Format (dd/mm/yyyy), Global Format (dd Month yyyy), or US Format (mm/dd/yyyy). |
|
TimeZone selection: Select one of the following time zones as required. |
||
|
Use browser time zone |
Mandatory |
Select the browser timezone. |
|
Use a custom time zone |
Mandatory |
Select the custom time zone. After you choose the custom time zone, the Select custom timezone list is shown. Select the timezone you want. |
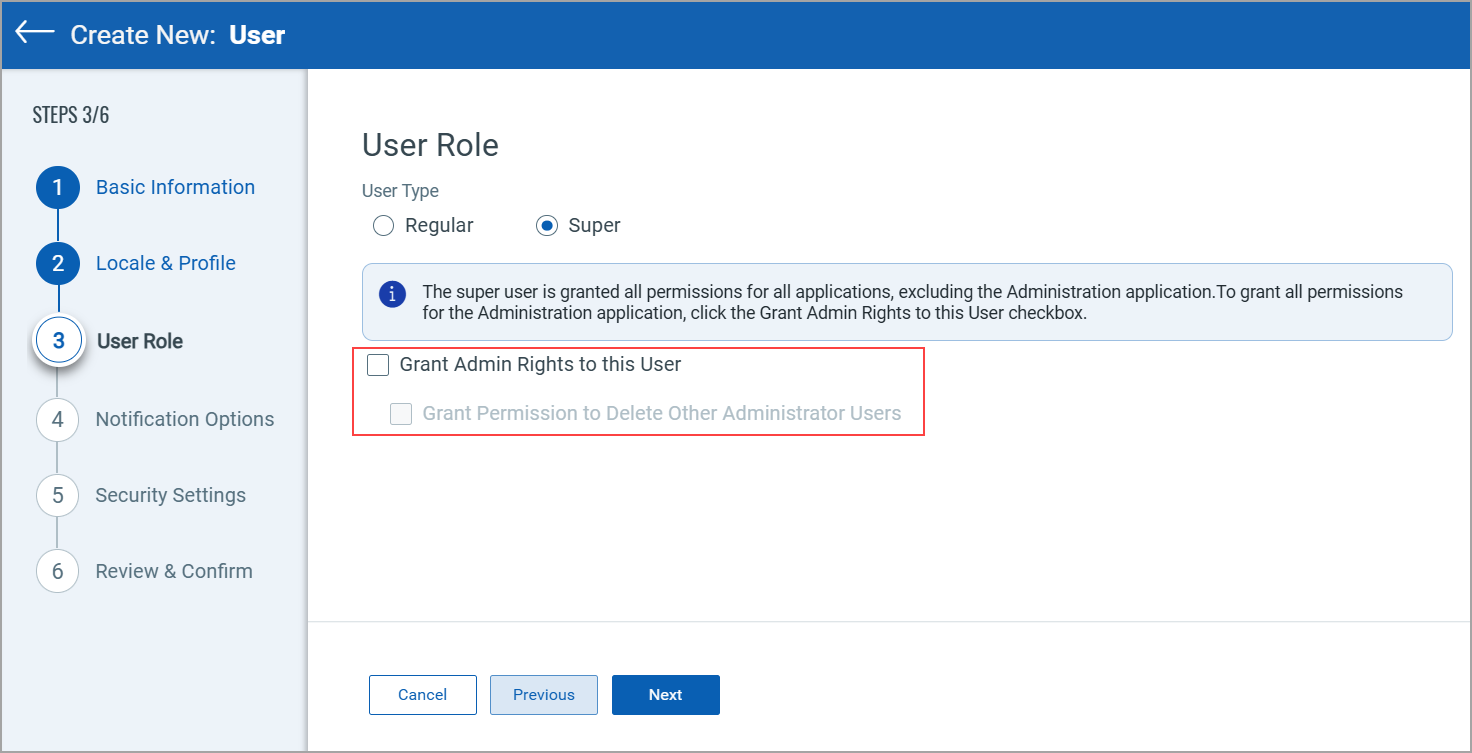
User Role
|
User Input |
Description |
|---|---|
|
User Type: Selecting one of the following user types is mandatory. |
|
|
Regular |
When you select the Regular user type, the user is granted full access to assets and all required permissions for Vulnerability Management, Detection and Response (VMDR), Policy Compliance (PC), CyberSecurity Asset Management (CSAM), Global AssetView (GAV), Cloud Agent (CA), and Unified Dashboard (UD) applications or modules. Note: By default, the Regular Manager has managerial access to Vulnerability Management (VM) and Policy Compliance (PC). |
|
Super |
When you select the Super user type, the user is granted full access to assets and all required permissions for all modules or applications.
Note: The super user is granted all permissions for all applications, excluding the Administration application. - Click the Grant Admin Rights to this User checkbox to grant permission to fully access the Administration module or application.
|
|
User Role |
Select the required user role from the User Role list. The supported values are Manager, Unit Manager, Scanner, Reader, Remediation User, Contact, User Administrator, and Auditor. Important: |
|
Additional Roles |
Select the checkboxes next to the roles listed in the Unassigned Roles section and click the arrow to move them under the Assigned Roles Section. By doing so, you can provide additional or custom roles apart from the default roles. |
|
Allow Access To |
Select the checkboxes next to GUI and API based on whether you want to grant the user the UI or APIFor access, or both. |
|
Business Unit |
Select the Business Unit from the Business Unit list. Note: The Business Unit list is shown only for the User Roles - Unit Manager, Scanner, Reader, and Remediation User. |
|
Allow user view access to all objects |
Select the checkbox only to provide the view access to all assets. |
|
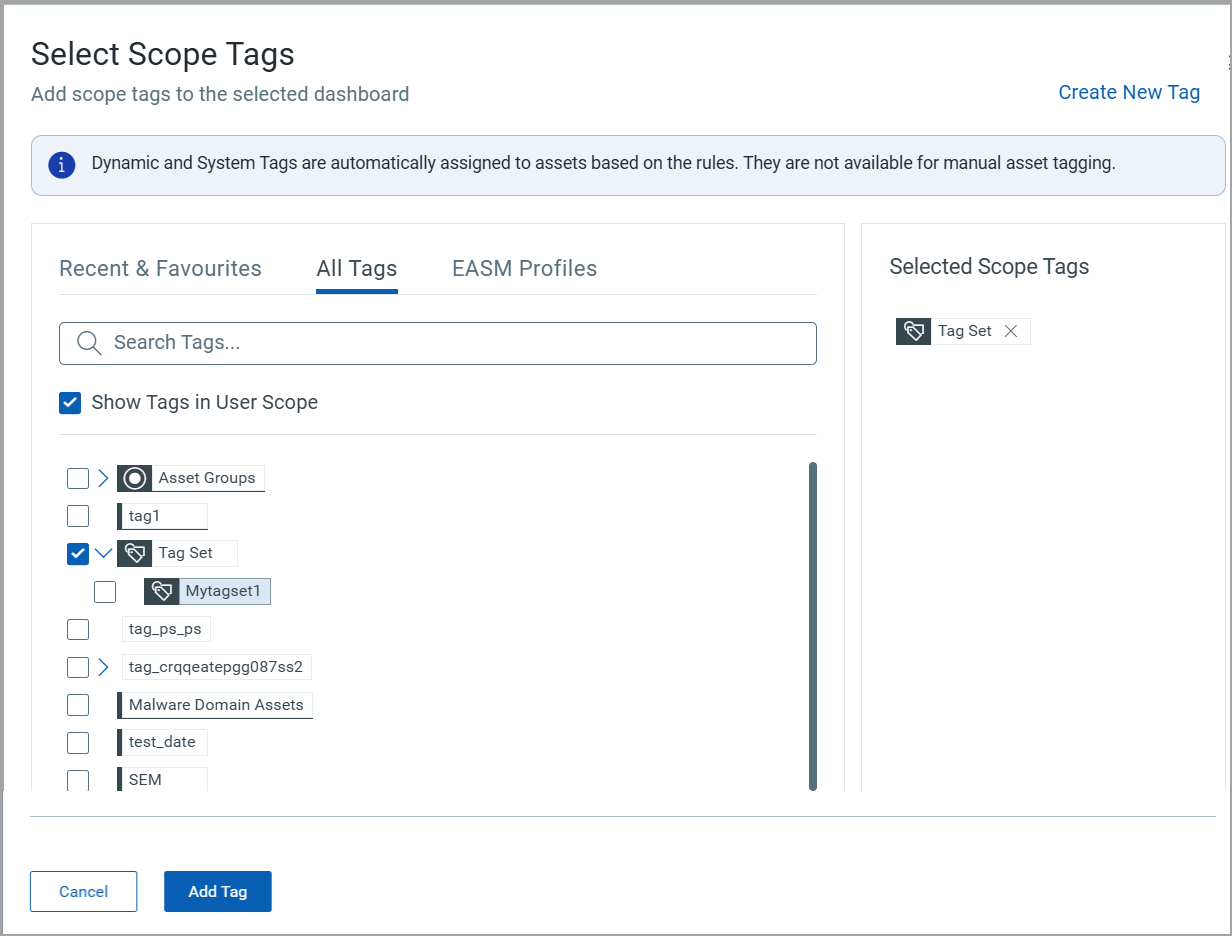
Include Tags |
Select tags to add to the scope of selected users. You can also select Tag Sets. Example:
|
|
Exclude Agent Assets from IP Range Tags |
Choose to exclude agent assets from IP range tags as per your requirement. |
|
Transfer Personal Configuration |
The checkbox is available for selection when you edit the user. |
|
Transfer Asset Groups |
The checkbox is available for selection when you edit the user. |
Permissions
You can configure these extended permissions for users with user roles - Unit Manager, Scanner, and Reader
|
User Input |
Applicable for User Role |
Description |
|
|---|---|---|---|
|
Manage VM module |
Unit Manager, Scanner, and Reader |
Select the checkbox to grant access to the VM module or application. |
|
|
Create/Edit Remediation Policy |
Unit Manager |
Select the checkbox to grant permission to create a remediation policy for their business unit. The rules set in the business unit's policy will take precedence over the policy set for the subscription. |
|
|
Create/Edit Virtual Hosts |
Scanner and Unit Manager |
Select the checkbox to grant permission to create new virtual host configurations for scanning. Users with this permission can add, edit, and delete virtual hosts for IP addresses included in the user’s account. |
|
|
Add Assets |
Scanner and Unit Manager |
Select the checkbox to grant permission to add IPs and domains to the business unit, and thus to the subscription. Once new assets are added, they are available to all Managers for inclusion in other business units and asset groups. |
|
|
Create Option Profiles |
Scanner and Unit Manager |
Select the checkbox to grant permission to create option profiles by default. |
|
|
Purge Host Information or History |
Unit Manager, Scanner, and Reader |
Select the checkbox to grant permission to purge host information collected from scans. Purging hosts permanently removes host information from your account. |
|
|
Create/Edit Authentication Records/Vaults |
Unit Manager |
Select the checkbox to grant permission to create and edit authentication records and vaults. |
|
|
Manage SCA Module/Manage PC Module |
Unit Manager, Scanner, and Reader |
Select the checkbox to grant access to the SCA or PC module or application. |
|
|
Accept/Reject Exceptions |
Unit Manager |
Select the checkbox to grant permission to accept and reject exceptions for compliance policies for the hosts in their business unit. |
|
|
Create/Edit Compliance Policies / Create/Edit Policies |
Unit Manager |
Select the checkbox to grant permission to create and edit compliance policies on the hosts in their assigned business unit. |
|
|
Create User Defined Controls |
Unit Manager |
Select the checkbox to grant permission to create user-defined controls (UDCs) for the subscription. |
|
|
Update/Delete User-Defined Controls |
Unit Manager |
Select the checkbox to grant permission to edit and delete user-defined controls (UDCs) in the subscription. |
|
|
Manage Web Applications |
Unit Manager, Scanner, and Reader |
Select the checkbox to grant permission to perform web application management tasks based on the user's web application access permissions. |
|
|
Create Web Applications |
Unit Manager, Scanner, and Reader |
Select the checkbox to grant the user the ability to create web applications. |
|
|
Manage Virtual Scanner Appliances
|
Unit Manager and Scanner
|
Select the checkbox to grant permission to create, edit, and delete virtual scanners from the scanner appliances list. |
|
|
Manage Offline Scanner Appliances |
Unit Manager |
Select the checkbox to grant permission to create, edit, and delete offline scanners from the scanner appliances list. |
|
Notification Options
Configure the notification settings based on which the user receives the email notifications.
|
User Input |
Description |
|---|---|
|
Latest Controls |
Click the Monthly, Weekly, or None radio button as per your requirement. This email notification helps the user understand the changes to technical controls, including new controls that have been added, controls that have been modified, and controls that have been deprecated. - When the Monthly option is selected, the email lists all controls that are changed since the previous month. - When the Weekly option is selected, the email lists all controls changed since the previous week. |
|
Latest Vulnerabilities |
Click the Weekly, Daily, or None radio button as per your requirement. The Latest Vulnerabilities email notification helps the user stay informed of new security risks by listing vulnerabilities and potential vulnerabilities added to the KnowledgeBase. With this information, the user can immediately launch scans against the most current issues. The email includes a .csv file attachment with more details about each QID. - When the Weekly option is selected, the email lists all vulnerabilities added since the previous week. - When the Daily option is selected, the email lists all vulnerabilities added since the previous day. |
|
Report Notification |
Click the My Reports or No Notification radio button as per your requirement. If you click the My Reports radio button, the user is sent an email notification when a report generated by the user is finished and available in Report Share. Note: This notification is sent only if your subscription includes the Report Share privilege. Managers receive the email notification for all reports. |
|
Exception Notification |
Click the My Exceptions or No Notification radio button as per your requirement. If you click My Exceptions radio button, the user is sent an email notification, including the details about the status changes to policy compliance exceptions. The user is notified of changes to exceptions that the user requested and exceptions that have been assigned to the user. Notifications are sent when exceptions are requested, accepted, rejected, reassigned, and expired. |
|
Daily trouble tickets updates
|
When this checkbox is selected, the user is sent an email notification about the daily trouble ticket details. The email includes a list of new remediation tickets that have been created and assigned to the user and tickets that have been modified since the previous day. |
|
Scan Complete Notification |
Turn on this toggle to send the Scan Complete email notification to the user. The Scan Complete email notification informs users when a scan task is finished (or is paused or canceled). It also includes details about the scan and a link to the results. This email notification option applies to all scan types. Managers receive this email for all completed scans, and Auditors receive this email for all completed compliance scans. For other users, this email is sent only for scans launched on their asset groups - groups assigned to them or created by them. |
|
Scan Summary Notification (vulnerability scans only) |
Turn on this toggle to send the user the Scan Summary Complete email notification. This email notification is sent only if New Scanner Services are enabled for your subscription. The notification email includes details, such as when the results from a vulnerability scan have been processed and are ready to be included in reports. Additionally, it provides vulnerability trend information based on the processed results, including the total number of new, reopened, active, and closed vulnerabilities. Note: |
|
Map Notifications |
Turn on this toggle to send the map email notification to the user. This notification mentions the details about when a map task is finished. Managers will receive this email for all completed maps. Other users will receive this email only for maps launched on their asset groups - groups assigned to or created by them. |
Security Settings
|
User Input |
Description |
|---|---|
|
Authentication Method Selection: You can select the Symantec VIP Two-factor Authentication method or the Enable SAML SSO authentication method. |
|
|
Symantec VIP Two-factor Authentication |
Select this checkbox if you want the user to complete the Symantec VIP two-factor authentication steps to log in to the Qualys UI. |
|
Enable SAML SSO |
Select this checkbox if you want the user to complete the SAML SSO steps to log in to the Qualys UI. Note: |
|
Session Timeout |
Enter the required user session timeout for the user. The supported range is 10 min to 240 min. |
Review & Confirm
Review the details you entered. When you are sure to proceed with the user creation with those details, click Submit.
Note: If you want to edit details, click the Pencil ![]() icon next to each section. You are redirected to the respective user creation workflow page. Make the required changes and navigate to the Review & Confirm page step-by-step.
icon next to each section. You are redirected to the respective user creation workflow page. Make the required changes and navigate to the Review & Confirm page step-by-step.
What Happens Next?
After the user is successfully created, an email is sent to the user. The username, OTP code, and platform URL are mentioned in that email. The user needs to complete the User Account Activation steps. Moreover, the user must also complete the authentication steps, either the Symantec VIP Two-factor Authentication or the SAML SSO authentication, if the authentication option has been selected at the time of user creation.
Related Link